
Colour Blending Techniques in Tapestry
- Liz Whiteside

- Jan 22
- 4 min read
Colour blending is often the moment tapestry weaving truly comes alive. It’s when threads begin to behave like paint, and your weaving starts to feel less like following instructions and more like making art.
With the launch of my new Advanced Tapestry Workshops, it felt like the perfect time to celebrate this wonderful (and slightly addictive!) technique. Whether you’re just beginning to experiment with multiple threads or you’re ready to push your work into more expressive, painterly territory, this guide will walk you through the essentials of blending colour in tapestry weaving.
How to Blend Colours in Tapestry Weaving Colour blending is one of the most expressive and transformative skills in tapestry weaving. It allows you to create depth, movement, light, and atmosphere — turning simple woven shapes into rich, evocative artworks.
When done well, blending softens transitions, creates illusion, and gives your tapestry a sense of flow that simply isn’t possible with single, solid blocks of colour.
In this blog, I’ll explore:
Why colour blending matters so much
The fundamentals of how it works
Common mistakes to avoid
Practical ways to build confidence through practice
Why Colour Blending Matters
Blending colours in tapestry weaving allows you to:
Create smooth, seamless gradients
Transition gently between tones and hues
Add depth and dimension to landscapes, seascapes, and abstract designs
Build mood, movement, and visual interest
It’s the technique that lifts a tapestry from feeling flat or graphic into something far more layered and atmospheric. This is especially powerful in natural subjects like water, sky, land, and light — areas I explore a lot in my own work.
The Basics of Blending
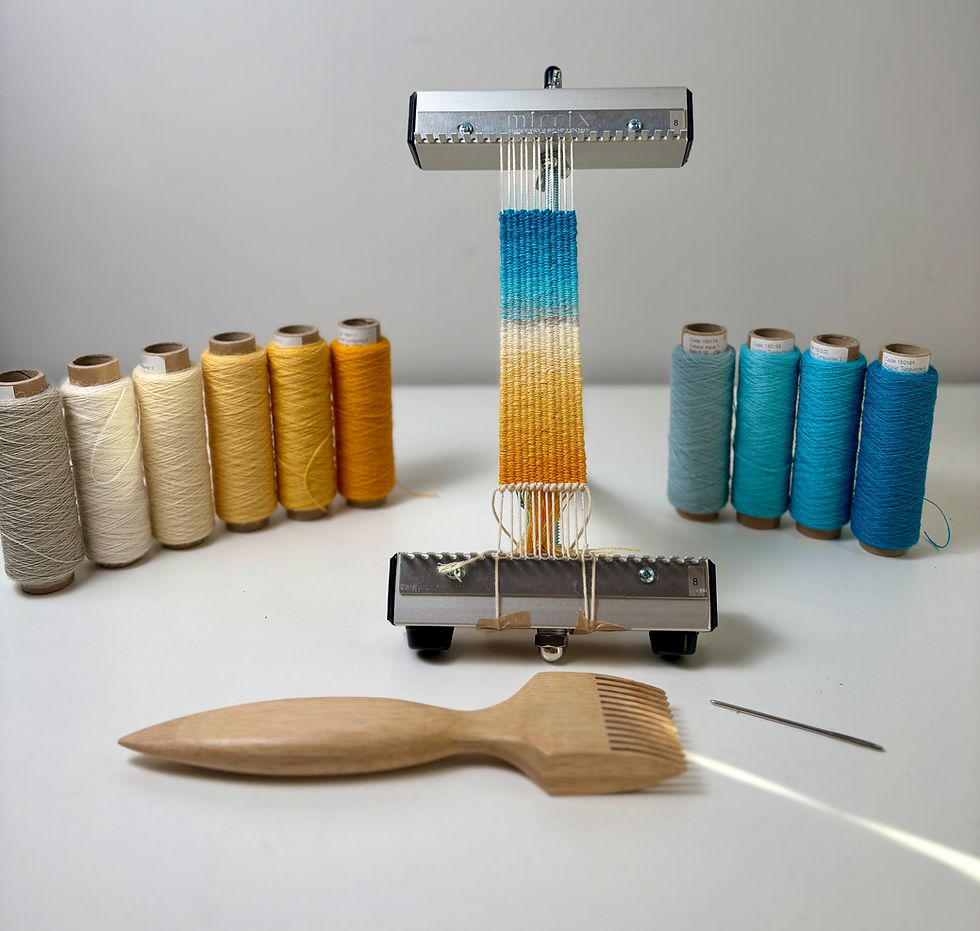
Most colour blending in tapestry is achieved by weaving with multiple fine threads at once, rather than a single thicker yarn. By gradually replacing one thread at a time, you can shift colour almost imperceptibly.
At 8 warps per inch, I typically use four fine tapestry yarns in my classes, progressing to five threads as we advance and want even more subtlety and control.
Here’s how a basic blend works:
Begin with 4 strands of Colour A
Change to 3 strands of Colour A + 1 strand of Colour B
Then 2 strands of A + 2 strands of B
Then 1 strand of A + 3 strands of B
Finally 4 strands of Colour B
From there, you can continue blending:
3 strands of Colour B + 1 strand of Colour C
and so on…
This slow, intentional shifting produces soft, natural gradients — very similar to the way paint mixes on a canvas. It’s a technique I demonstrate step by step in my online classes so you can really see how the colours interact as you weave.
Tips for Successful Blending
A few practical tips can make a huge difference:
Choose yarns with similar textures for smoother, more cohesive transitions
Keep your tension even to avoid ridges, dips, or visible banding
Plan your colour changes before you begin weaving (a little preparation goes a long way!)
Blend across a wider area for more subtle, atmospheric effects
This approach allows you to create painterly images without relying on detailed drawings or cartoons — as you can see in the seascape sample below, where the colour itself does the work.

Common Mistakes to Avoid
Even experienced weavers can fall into these traps:
Switching colours too quickly, which creates harsh lines instead of soft transitions
Mixing very different yarn textures, leading to uneven surfaces
Over-packing the weft, which can distort the fabric and muddy the colours
Ignoring value (light and dark) — blending works best when values shift gradually, not randomly
Being mindful of these points will instantly improve the clarity and elegance of your work.
Practice Exercise
If you’re new to blending, try creating a small bookmark-sized sample, like the one shown in my first image above. I recommend buying gradient colour packs and choosing your favourite colours to start with. Depending on where you are in the world, there are plenty of excellent tapestry yarn suppliers (I’ll list a few below).
Focus on:
Smooth, gradual transitions
Consistent beating
Changing one thread at a time
This simple exercise builds confidence and helps you truly understand how colours behave when woven together. From there, you can begin applying the same principles to a finished artwork.
Taking Blending Further
As your blending skills progress, you’ll find you can break colour changes into much smaller areas, allowing for increased movement and complexity.
In the piece below, I introduced hatching within the blended areas to create a sense of motion in the water. This combination of blending and directional weaving opens up exciting new possibilities and gives your tapestry real energy and life.

What's next?
If this technique has sparked your curiosity but you’re brand new to tapestry, my Beginner’s Tapestry Course will give you a strong, confident foundation.
If you already have a basic understanding of tapestry weaving, my Artful Threads online course might be just right for you. I’ve seen students go on to create truly beautiful, original designs using the techniques taught there.
Note: I have a separate tapestry school for EU students. All the links can be found on my website.
And for those ready to go even deeper…
✨ 2026 marks the launch of my brand new Advanced Tapestry Workshops, held in the heart of Newcastle upon Tyne. These workshops focus on colour blending, refinement, and artistic development — perfect for weavers ready to push their work to the next level.
A final note:
I could not create my vibrant art without the beautiful yarns available today. Here are just a few excellent options:
Weavers Bazaar - UK based but ship worldwide, inc EU Gist Yarns - US based
Australian Tapestry Workshop - so many colours to choose from
I’ve also recently discovered mixing silks into my work — a blog on that will follow. 🙂
Happy weaving
Liz
x


Comments